Showing posts with label kids will eat this. Show all posts

Wednesday, June 22, 2011

A Bread Challenge and Other Taunts

A reader just wrote in: "Now that you've mastered Rainbow Cake, are you Woman enough to take on Panda Bread?!"

Panda Bread


I have 2 words for you loyal reader....


Thursday, June 9, 2011

Rainbow Cupcakes or Tie Dye Cupcakes, You Decide

The Rainbow Cake has been such a big hit on the blog, Facebook, and the office that I've decided to make a shortcut version for y'all that don't have hours to build a 6 layer cake. This one I made in cupcake form, but you can translate it into a single layer or double layer cake if you choose. I made these for a company meeting we have to go to today, and was able to whip them out (with baking time) in a little over an hour. The ingredients are almost the same as the Rainbow Cake:

• 1 – Box of cake mix in vanilla, white, or French vanilla flavors. (The cake base has to be white so if you see another boxed variety that would normally produce a white cake on completion, by all means go for it and tell me how it works out for you.)

• Whatever ingredients your cake mix says it needs to be made (usually eggs, oil, and water.)

• Muffin cups

• Gel food coloring in blue, red, yellow minimum. Splurge for more colors as your budget allows. Gel works better than the cheap kind that you dye Easter eggs with. You will use less dye, and the colors will be more vibrant.

• 1-2 tubs of icing. I chose white butter cream, but you can pick any flavor.

• 1 - Muffin pan (I had two muffin tins from a previous debacle, so I was able to cook all my cupcakes at once.)

• 6 bowls and spoons to mixing the colors in. Cereal bowls work just fine.

First things first, you need to make your cake batter according to the box's instructions. When it is nicely mixed, separate it equally into your six bowls. You can measure if you have OCD, or you can eyeball it like I did.

Once your batter is separated, add each color dye to its appropriate bowl. If you forgot/don't know how to make certain colors, read the Rainbow Cake post linked above.

Batter up!

Add your muffin cups to the tins and preheat your oven.

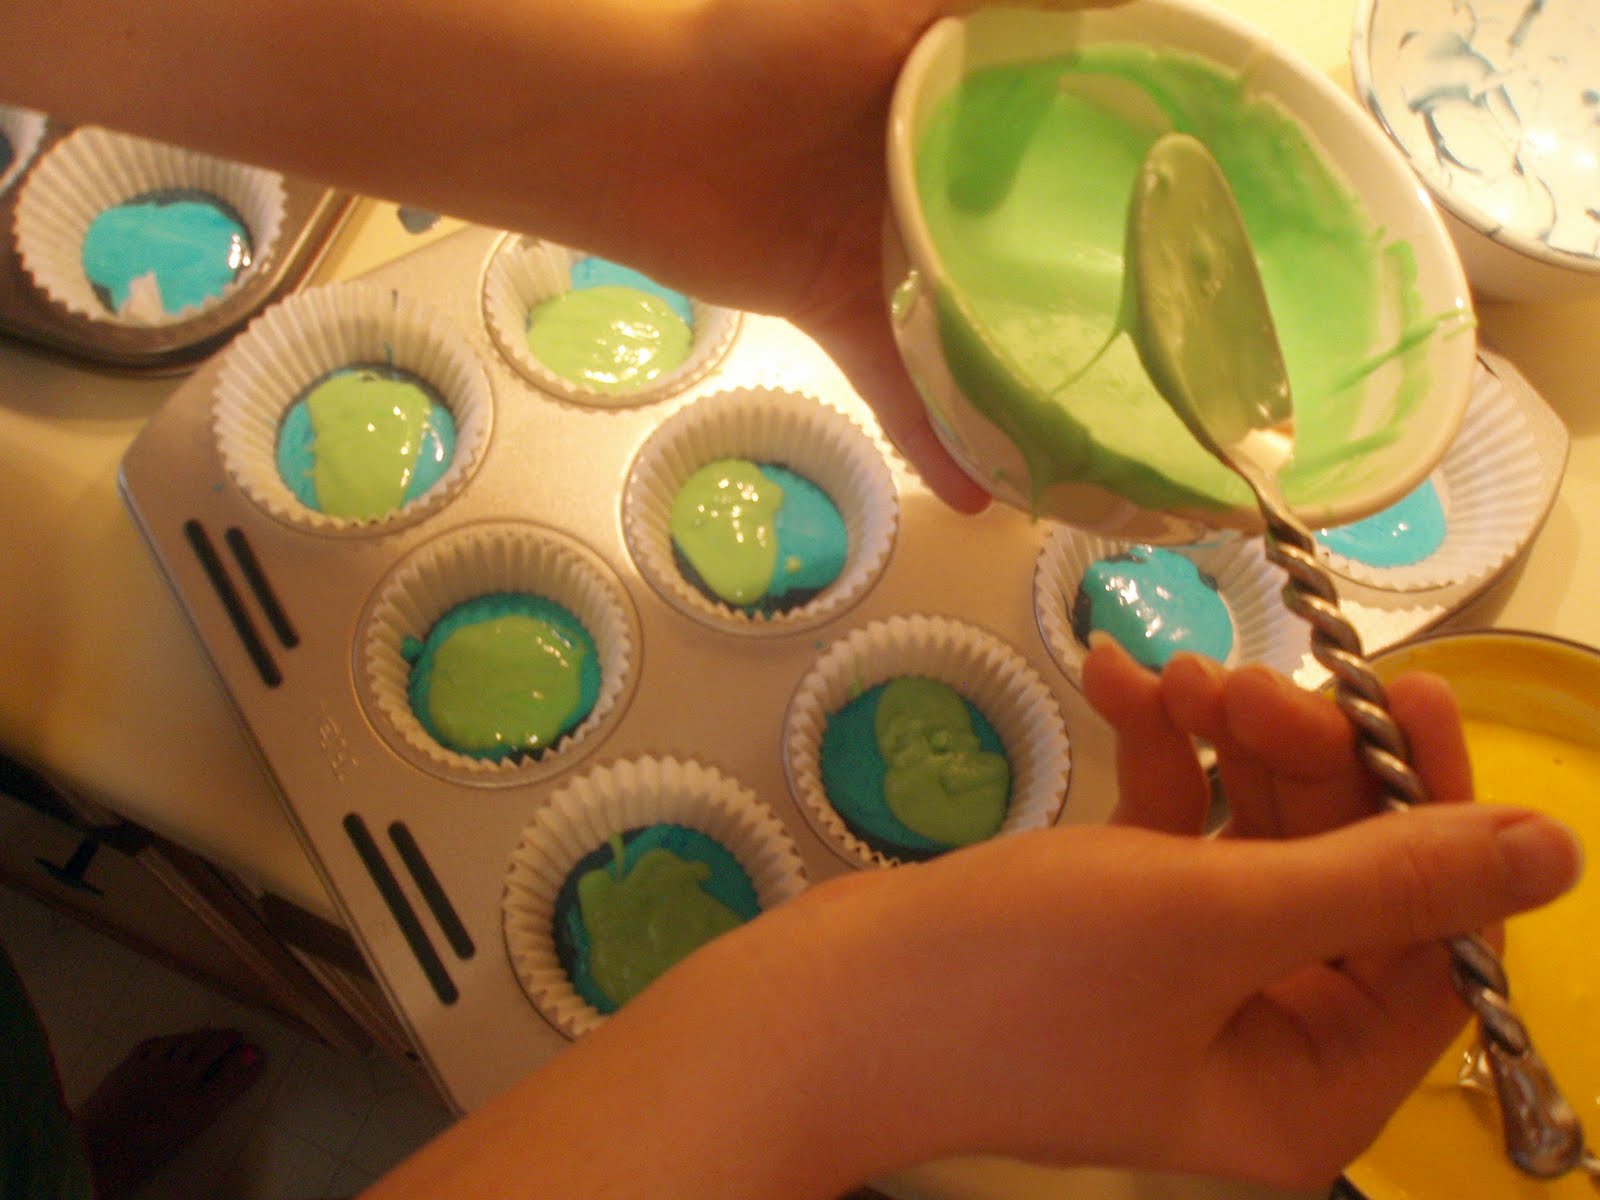
Now, we are going to add the colors. If you want red on the bottom, you will add the colors in this order: Red -> Orange -> Yellow -> Green -> Blue -> Purple.  If you want purple on the bottom, reverse that order. I put purple on the bottom because I added too much blue to mix and my purple came out ugly. Oh well.

Add a little of the first batter into the bottom of each cup. Just a spoonful or so. You only want the muffin cups 2/3rds of the way full once ALL the colors are added. Plus you may run out of particular batter color if you are overzealous like me. Only 21 of my 24 cupcakes got purple bottoms because I was too generous at the beginning. Start spooning in a small and add more after all 24 have a little of that first color.

If you want neater layers. Tap/shake the pan a couple of times between layers to help the batter settle flatter. You will also have to be more gentle when spooning in the layers so that the force of your plop doesn't send the newest color careening towards the bottom of the pan. If you want a more rainbow tie die effect, just plop and go, maybe just poke a toothpick in a few times. Don't over do it or they will all turn out 1 color. Now, if you are wanting those Polly Perfect rainbow layers, you might as well make the Rainbow cake. In the baking process, the cupcake layers will mix a little in odd ways and there is really no stopping it. Let your OCD rest for a day and let nature do its thing.

Continue to build up your layers in order. Remember, start with a little of the color in each cup and go back an add more if you have left overs at the end of each color round.


Purple, blue, green.

All 6 colors. Got a little short on orange as you can see.
Once you have all the colors in the cups, give the pan a firm tap or two to settle the batter in the pan. DO NOT under any circumstances try to swirl the colors with a knife or toothpick. This will blend the colors and you will end up with a bluish brown cupcake mess. If you wanted that, you should have just baked chocolate cupcakes. You can now bake the cupcakes as the box directs.


Weird blue dots on the left. Pretty nonetheless.
Wait until the cupcakes are completely cool before you ice them. Then they are ready to enjoy!

Little Cuties!
Tie dye on one hand, rainbow on the other. Delicious just the same.

Tuesday, June 7, 2011

Technique Tuesday: Making Roses from Gumdrops

Today, I'm going to show you how to make fancy gumdrop flowers to decorate a cake or cupcake with. Certainly, easier than an icing flower, these beauties have an extra sparkle that will add a bit of drama to a plain looking cake.

                                                               (c) Real Simple
 First things first, you will need the following:
  • A bag of gum drops. Each flower requires 3 gumdrops, so buy appropriate to your needs.
  • Sugar
  • Knife
  • Optional: rolling pin if you have one. If not, no big deal.
Sprinkle your work surface with a good bit of granulated sugar. Pull out your 3 gumdrops and use your rolling pin or the heel of your hand to smash to the gumdrop into a thin, 1/8" or so flatish disk. If it sticks to your hand or the pin, sprinkle more sugar on the drop.


Hulk Smash!
Next, you need to cut the disks in half, no big deal, don't freak out.

Aww..snap! Cut like a gansta!
Okay, the next part is kind of tricky so pay attention. Take your ugliest cutting and roll it up really tightly on itself. This will make the interior part of the bud. The heat of your hands will start to melt the drops a little, so sugar up as necessary. Pinch the bottom of the bud to secure the roll in place.

Use the remaining half-circles to continually wrap around the interior bud, pinching the bottoms together as you go. Try to overlap the seams so that they aren't all on the same side. It's not a lot of work and you get this really pretty little decoration.


Awwww

Just keep repeating the steps until you get as many as you need. Remember this is a garnish, so you don't have to make 900 of them, just a few for the center. They are very dense, everyone is not going to want to chew on one of these, probably only the kids. You want the cake to be the star, not the flowers.

Right before you are ready to put them on your cake you are going to need to cut the pinchy bit at the bottom off so that it will sit flat on your cake. We are going to chop that off.


Chop off the pinchy bit.
 Then you're ready to decorate with these little guys. Enjoy!

Tuesday, March 29, 2011

Rotten Bananas: Take 2

We buy an awful lot of bananas around this joint, and dammit if they don't go bad before we get a chance to use them. I think I've Banana Breaded out everyone, so I thought perhaps a banana pudding would be a better way to go this time. I know it's almost foolishly simple to list how to make it here, but there are some people who cook so bad, they may need my assistance in getting it right. So, here we go.

Ingredients
1 box of instant vanilla pudding
2-4 medium sized bananas that are as spotty as a Las Vegas Grandma's forearms, chopped into small discs
1 box of Nilla Wafers Cookies
2 cups of cold milk

In a bowl, whisk together the instant pudding and the 2 cups of milk. It will soft set in about 3 to 5 minutes of whisking. When it soft sets, put it in the fridge to chill.

Next find you a good casserole dish or a large bowl to make make the final product in. You can get all Polly Perfect on it and make concentric circles of wafers and thin banana slices if you like. I, on the other hand, just made a bottom crust of cookies, the slapped a good mess of naners on top of those.

Fuck Polly Perfect
Then, you will need to add your chilled pudding. You can do a thin layer, then add some more bananas, wafers and more pudding. Or, you can just dump in your pudding like me. No appreciates your artistry here.

After that, you can add a nice layer of bananas and wafers to the top portion. I like to crumble a few for texture and prettiness. You don't have to. You can be all pirate's treasure on yours and trick your guests into thinking they are just eating plain pudding until they chomp into some mystery item. Is it banana, cookie, or toe nail? Only you will know the truth and you can giggle menacingly at their psychological torture. BWAHAHAHAHA!

On Nom

Wednesday, March 23, 2011

Sweet Anniversaries and Other Great Achievements

I know Jonathan and I just got married in December, but it was so close to our 5 year anniversary that I HAD to do something. He is also having a crummy time at the office, so I thought I might do something to brighten up his day.

Guys get embarrassed about flowers so I didn't want to send those. I decided that perhaps a cookie or candy bouquet would be better because a fruit bouquet would have probably gone straight in the trash. He scorns all things healthy. After Googling around, I found some neat ideas. Since he is a Reese's Peanut Butter fiend, I thought this number would be nice:

Awww!

That was until I realized that it cost 60 freakin' dollars! Sixty dollars + delivery charge for 12 standard sized Reese's PB cups plus another dozen or so "fun size" (read: mini) ones, a bow, and tissue paper. Screw THAT! I decided I could probably make it on my own and save myself some money. Not that he isn't worth the $60+, but if I ever want to move out of our ghetto hovel, we have to make some cuts somewhere. So I made a scaled down version because he didn't need THAT much candy, and I had to sneak around the house in spells to get it done. It would have looked suspicious if I carried in a giant grocery bag of candy. I swear he is like a puppy following me around at times. So here is a look at how it turned out, and I will give you a general brief on how it is made:


Not quite as flashy, but does the job. Probably should've added a bow. Oh well.

 To do this project, you will need:

  • 1 cheap flower pot, coffee cup or tin bucket
  • Floral foam that will snuggly fit into the bottom of your cheap pot
  • Wooden craft sticks, dowel rods, or Popsicle sticks in the number appropriate to the number of candy stems you want.
  • A hot glue gun with hot glue. Hopefully, your gun has a "low" setting.
  • 1 bag of crinkled paper. (If you are cheap like me, you found some old construction paper you had lying around from a previous project, accordion folded it a bit, and sent it through the paper shredder. Ta-freakin-da! Shredded crinkly paper at half the price.
  • A big bow (if you're into that sort of thing)
  • Your loved one's favorite candy bar in a variety of sizes, in the amount according to the number of stems you want.

Heat your glue gun on a low setting and grab all your supplies. You can glue your foam into your container if you like. I didn't so I could reuse the flowerpot. The end result wiggled a bit because of this, but it was no big deal. If you want to glue it in, put a ring of hot glue around your floral foam and press firmly into the bottom of the container.

Now it is time to start making your "flowers". Turn your candy face down so that you will be displaying the candy name in the final product and not gluing over it. Spread enough glue along a wooden stick that will run down the entire length of the candy bar. Give it just a second to cool so that it does not melt the plastic wrapper of the candy. Then, firmly press the wooden stick into the back of the candy packaging. Repeat for all your stems.

Once all your stems have had time to harden, jab them into the floral foam at various heights and rows. Start with the back and tallest row first, working your way shorter and more forward. Feel free to break of the bottom of your sticks to achieve different heights. An ugly bottom won't matter because it is hidden in the foam.

Slap a bow on the pot for good measure. We had no bows, guys don't dig bows. ALL RIGHT! I forgot the damn bow. Stop judging me. Add the crinkly paper around the base of the sticks to hide the floral foam, and there you go.

I'm sure mine would have looked better if I had more time. (I.e. not done while hopping on one leg while trying to pull pants on for work and running late as usual). The happy effect was achieved despite missing the bow. My beau was happy to get some sweets on a day that was so completely shitty, except for the fact that 5 years ago on that day we became a couple. He was even sweet enough to bring one candy home for us to share.

Sunday, March 20, 2011

Unfortunate Fortune Cookies

Prior to filleting my finger, I had decided to try to make fortune cookies for a friend's birthday get together. I haven't got anything particularly pithy to say about it, and I've stalled long enough trying to come up with something clever. So, while I am out of the kitchen, I might as well get you caught up on some of the cooking-goings-on about the joint.

Our core group of friends is scattered all over the city. That may not seem like such a big deal until you realize that Houston has a circumference of over 100 miles. Observe:


Not true to scale because the map does not quite go wide enough North/South to capture the distance between the Hovel and Roy-mantha's, or far enough East to get the true location of Kail's joint.


We chat through Facebook from time to time, and OF COURSE they are all loyal readers so you might be able to guess who some of them are. Anyway, Facebook may bridge a gap, but it does not fill the void that is left when you miss the people who were your best man, your future baby's godparents, your matron of honor, your ambulance driver, and the group that will show up for a last minute birthday dinner when everyone else blows you off. Hence, we have monthly game night at a different house each month. February was Team Robinson's turn due to being proud new home owners, and having a birthday to celebrate. So, we all piled into our vehicles and made the trek.

I had known that I wanted to make fortune cookies for Mrs. Robinson's birthday for awhile, but I hadn't got any practice in so I had no idea how they would turn out. I Googled what appeared to be a basic recipe: Mostly egg whites, flour, vanilla, water, and a bit of almond extract. "No big deal," I thought. "I've got this."

I started out by making up a few fortunes and printing them, and cutting them to size.

My favorite fortune ever: "Man who stands on toilet is high on pot."

The dough (that I have seen in several YouTube videos) is supposed to be very thin and runny. My dough was very thick and coarse. I decided to slowly add more water until I achieved my desired consistency.

When the batter was runny enough to my liking, I made coaster-sized discs on a well greased cookie sheet and baked until that magical "just done" time in a 400 degree oven. Working quickly, you have to get a cookie off the pan, place the fortune in the middle and fold it in half. You have to work fast, in theory, because the cookies harden into little crisps that won't bend if they cool. So snap to it!

Ouch, hot tamale! Wait, wrong ethnic group. Ouch, hot Wonton!

The next part sounds a bit weird, but you then have to bend the cookie over the rim of a coffee cup and put in a muffin tin to cool and harden. Bending it over the rim of the cup makes it into the exact right shape. 


Well, most of my fortune cookies never got truly hard. They tasted okay, but they were more like thin, almondy sugar pancakes. I had to make up for this failure by at least making them prettier to look at. If people were busy oooing and awing over them, they wouldn't notice that tell-tale texture was completely missing slightly less than ideal. Besides, Mrs. Robinson loves that sort of thing (meaning cutesy stuff).

Being now that I am a Goddess of the Double Boiler, I decided to chocolate dip them and sprinkle with, well, sprinkles. Do I need to remind y'all how to do that? Okay, last time for you newbs:

1.) Never melt chocolate in a microwave! Always use a double boiler. (i.e. pot of boiling water with a bowl of chocolate snugly placed over it. Stir frequently and do not walk off or this may happen.


 Next, all you have to do is dip your cookie tips into the melty goodness and sprinkle with rainbow sprinkles.

Dip and Sprinkle!
Everyone at the party ended up liking them despite their unfortunate texture. I thought y'all might enjoy a self-portrait with the completed product. Enjoy and happy Sweets Sunday.


Andrea c.2011, the Chocolate Sprinkle Period.

Friday, March 4, 2011

Kick Ass Shepherd's Pie

Hey guys! I am so excited to tell you about this recipe and how I pulled it off flawlessly by "thinking like a chef" and bypassing some goof-ups I made early on and turning out an excellent meal. 

I am proud to say even the leftovers are now gone, which says a lot in this house. Jon was very sweet with his compliments: "This is so good that not only would I eat it again if you made it, I would feed it to other people." That's my man, forever the charmer. 

Let's rock out some Shepherd's Pie, kids! 

First things first, Shepherd's Pie is traditionally made with ground lamb or cubed lamb shoulder. Not only is mutton a little difficult and pricey to get our hands on here in Houston, we aren't the biggest lamb eaters. Instead, I used ground beef. It was magnificent. I imagine if you want to use beef stew meat diced into very small cubes (like 1/4") you could use that as well. 

I made my Shepard's Pie off of Chef Anne Burrell's Shepherd's Pie. If you want her recipe, click her name. How I made mine is listed below:

  • Olive oil, as needed
  • 1 pound ground beef
  • Salt
  • 3-4 heaping Tablespoons of flour
  • 1-2 ribs celery, cut into 1/4-inch dice
  • 3 carrots, peeled and cut into 1/4-inch dice
  • 1 quarter to 1/2 of a large onion
  • 2 cloves garlic, smashed and finely chopped. (Garlic powder got me through because I just ran out of fresh)
  • 1/4 cup tomato sauce
  • 1/2 cup red wine
  • 3 to 4 cups chicken stock
  • 1 fat pinch of thyme
  • 2 pounds potatoes, peeled and cut into 1-inch dices
  • 3/4 to 1 cup milk (warm if you have the time)
  • 2 to 3 tablespoons butter
  • 1/2-1 cup frozen peas
You'll notice that mine will make a smaller portion, feeds 2 starving, college frat boys, or 4 people eating moderate portions with a dinner roll or something. As previously mentioned, mine is made with beef instead of lamb. In addition, I added a bit of onion because, hey, why not? Also, my Shepherd's Pie is differing from Chef Anne's because it is missing leeks, tomato paste and bay leaves. Why? I didn't have them and had to make do (due?). 

Haha. I just said doodoo. *crickets* Ahem, moving on.

I also didn't have fresh thyme, so I think like a chef and improvise. I used a pinch of the dry stuff instead. As far as the tomato paste goes, thought I had it but I didn't. It was tomato sauce. I used a quarter cup of it instead and slipped the remainder into a half used jar of pasta sauce that was hiding out in the fridge. No one was the wiser.

Enough stalling, let's get to the heavy lifting.

    Distructions:

    Coat a wide pan, like a sauce pan, with olive oil and bring to a medium-high heat. Season the beef with salt and toss with the flour. Add the beef to the pan and brown well. Remove the beef from the pan and reserve in a bowl you have lying around. Ditch the oil in the pan and add a splash new olive oil.

    Add the celery, carrots, and onion to the pan. Season the mixture with salt and cook, stirring frequently until the vegetables are soft and very aromatic, about 8 to 10 minutes. Add the garlic and cook 2 to 3 minutes more. Add the beef back to the pan and stir to combine.

    Add the tomato sauce and cook until the tomato sauce starts to brown, about 2 to 3 minutes. Then, add the wine and cook until it reduces by half.

    I love cooking with wine. Sometimes it actually makes it into the dish.


    Add enough stock to just cover the surface of the beef mixture. Taste and season with salt and pepper, if needed. Sprinkle in the thyme. Bring the stock to a boil and reduce to a simmer. Partially cover and simmer for at least 30 minutes to an hour, or until the kids start complaining that they are starving. If you are using the stew meat, you will need to continue cooking until the meat is tender. When the stock level reduces replace with more to keep the meat just submerged.

    In the mean time, we have to make the mashed potato topping. Place the potatoes in a medium saucepan and cover by 1-inch with tap water. Season the water with salt and bring the water to a boil. Boil the potatoes until they are fork tender, about 15 minutes. Drain the water from the potatoes They don't have to be soupy or super creamy. They need a little heft to them to stay on the top of the pie and form a hardy "crust".  Get one of the kids to mash them with a hand tool or mixer while slowly adding the butter and milk. Taste and season with salt, if needed.

    Remove the lid from the beef and add the peas. Simmer for 15 minutes more to allow the stock level to reduce. Taste and adjust the seasoning, if needed. When done, the beef mixture should be thick and stew-like. Not soupy.

    Preheat the broiler.

    Transfer the beef mixture to a wide, flat baking dish like a Corningware dish. Spread the mashed potatoes over the beef mixture in an even layer.

    Just like this...


    Place the baking dish under the preheated broiler. Broil until the potatoes are golden brown and crispy. Don't walk off! This only takes a few minutes and if you aren't paying attention, they will burn. If you are as truly awesome, your dish will come out like this:

    Okay, not very pretty, but damn tasty.
    Enjoy!

    Thursday, October 28, 2010

    Recipes You Learn Along the Way...

    Going through life and minding your own business, you sometimes pick up useful tidbits from unlikely places. When I was in high school for instance, I was madly in love with this guy (which by the way I was scheduled to marry him in June of 2001, but that is a train-wreck for another time).

    Anyway, I would go over to his parent's house and try to be as helpful and pleasant as possible. There were 5 kids in this household in a pseudo-Brady Bunch situation, and me being frequently-visiting type I am made it six. His mom's pantry was always full of tasty consumables, but trying to have a proper sit down meal around 6 teenagers was near impossible. She did eek it out sometimes to the tune of this cheap recipe. It could be served as any meal, and none of us complained when it was breakfast the next day. (not that I ever had it for breakfast at that time. I had to be home by midnight on Friday and Saturday thank you very much!).

    Today's lesson, kids, is how to make Stromboli a la Bobby's Mom:

    You will need:
    1 package of frozen self-rising bread loafs (the kind I buy comes 3 to a package)
    non stick cooking spray and saran wrap
    1-2lbs. of breakfast sausage in your favorite flavor  (substitute chopped ham lunch meat for a healthier version)
    1 large pack of shredded cheese that you like

    Distructions:
    Depending on how hot your kitchen is, you will need several hours to rise the frozen bread dough. Some people, who live in really well insulated homes, put it out before they go to work and it's risen enough to get by when they return after work. Putting it out about lunch time is average. Place the loaf in a well greased bread pan. (1 loaf feeds 2-3 people so rise the number that you need accordingly.) Spray the top of the loaf with more cooking spray, and loosely cover with a large piece of Saran-wrap. This will prevent the dough from drying out and/or sticking as it rises. Let the dough rise until it is about an inch over the edge of the pan.

    When the dough has risen, or nearly risen, go ahead and fry up that breakfast sausage. One pound is enough for 2 loaves.When the sausage is sufficiently browned, for the love of God let some of the fat drain off on a few paper towels while you do the next step. Your heart will thank you later.

    Pour some of that shredded cheese on a prep-plate, or just have it ready to get out of the bag, whatever.

    Now this next bit might seem a little counter-intuitive after the whole, wait 10 hours for the bread to rise bit, but hear me out. The next thing you do is pop the dough and make a little trough in the middle like so:

    Pop!

    n' trough


     The next step is laying down a layer of cheese, followed by a layer of meat, then more cheese.


    Okay. The next two steps are tricky, so pay attention Myrtle. You are going to now seal up the loaf so that its guts are neatly encased. Simply fold over the edges and pinch them together. Gently now, don't get too rough:

    Pinchy, pinchy
    Now, if you're a bit lazy like myself, you can just pop it in the oven as is, and cook according to the bread bag's suggestions (usually like 20 minutes). But if you are a Polly Perfect and want to impress your son's girlfriend with your culinary skills, you can do the flip. Very carefully and oh so quickly, slide your hand under the entire loaf and flip it over so the pinchy side is down. Behold:

    Now is not the time for pinching.

    Flop! *raspberry noise*

    Bake immediately as the teens are probably growing restless and pilfering bits of dough and cooked sausage. When it's done, slice it into pieces like any old loaf of bread. If you're a natural, it will look something like this:

    I suppose could have put peppers and onions and other veggies in there if you like.


    As a mom, you can try to do the respectable thing and serve this with a salad or something green, but let's be honest here, we're Americans. Grab a coke from the fridge, sit down in front of the tv, and enjoy the stromboli for what it is.