Showing posts with label Polly Perfect. Show all posts

Friday, May 27, 2011

Taste the Rainbow: How I Pulled Off The Rainbow Cake!

I won the cake category at this year's department bake off with this beauty and it is really simple to make if you are looking for a huge WOW factor from your guests. It's the perfect cake for your rainbow loving friends of all ages.

So, there are several ways to make it, but I am going to go with the most straight forward, boxed variety way. If you have a good homemade recipe for a white or vanilla cake, by all means go with that, freakin' Polly Perfect. This recipe is for the rest of us who have to work 50 hours a week, commute 2 hours, raise kids, and go to church on Sundays with the in-laws. Let's get started.

Ingredients
  • 2 - Boxes of cake mix in vanilla, white, or french vanilla flavors.
    • (The cake base has to be white so if you see another boxed variety that would normally produce a white cake on completion, by all means go for it and tell me how it works out for you.)
  • Whatever ingredients your cake mix says it needs to be made (usually eggs, oil, and water.)
  • Non-stick cooking spray
  • Gel food coloring in blue, red, yellow minimum. Splurge for more colors as your budget allows. Gel works better than the cheap kind that you dye Easter eggs with. You will use less dye, and the colors will be more vibrant. 
  • 1- 4.5 lb tub of icing. I chose white butter cream, but you can really pick your flavor here. If you can't find a big tub like the one at the link, aim for about 9 cups of icing in smaller containers. You will seriously use it all. White gives the biggest contrast between the colors, so consider using almond, root beer, or lemon extracts as flavorings if you want a flavor. Look in your grocer's baking spice area for different flavors you can mix into a plain icing. If you must have chocolate or strawberry, who the hell am I to tell you otherwise? Go for it.
  • 1- 8" cake pan (though having four pans would really speed things up. I had 2 pans going at once and had to make the the cake in 3 batches.)
  • 6 bowls and spoons to mixing the colors in. Big cereal bowls work just fine.
Okay, first things first. Freakin' mise en place. Having all your stuff in one spot and ready to go will save you so much time. This cake took like 5 hours to make because of my ghetto stove and limited amount of cake pans. Do yourself a favor by having everything ready to go when you get started. I am going to assume that you only 2, 8" cake pans like myself. If you were smart enough to borrow some pans from friends, you are wicked smart and certainly have more forethought than me.


Have yo shit together!

Start by preheating the oven and making the batter of one of the cake mixes per the box's instructions. Once your batter is amalgamated you can use a measuring cup, or your good eye, to separate the batter into 3 of your bowls in equal amounts.

Next, decide whether you want purple or red as the bottom layer. Why you ask? Because if we cook the cake in the order we want to stack it, we can ice it as we go instead of waiting for the layers to cook and cool out of order. We are starting with purple on the bottom.

Grab your gel coloring and get ready to mix it in your separated cake mix. Now, how many of your remember the color wheel from art class? If you only bought the standard 4 color box of food coloring, you're going to need it to make purple and orange. If you bought the bare minimum of blue, yellow, and red, you will need to make purple, green, and orange. Here is a wheel to remind you how.


To make purple, you will mix red and blue together. Start with a small amount of dye, only a few drops of each, and stir stir stir. Keep playing with adding a little red or a little blue until your desired purple comes out, or you get close enough to be satisfied. For the love of God don't mix in any other color besides blue or red, or else you will get brown. Thoroughly mix in the dye so you don't have streaks when you pour the batter into the pan.

Next you will need to make blue. Simple, just use the blue dye and stir like a boss.

Then, you need to make green. Start with a just a few drops of blue and a lot of yellow, or else you will have a really dark green. Add one drop of blue at a time after that to get your desired green.


I paid attention in art class!

Now, pour your purple batter into one greased cake pan, and the blue batter into the other greased cake pan. Put in the oven. Now keep in mind that you are going to have a reduced baking time due to the fact that you have split your batter. My layers took between 18 and 20 minutes to cook. The box said it would take 45 minutes. I would have had a brown and black cake if I weren't paying attention. So check on your cake layers after about 15 minutes. You will know you are close to done when the edges of the cake start to pull away from the pan, and a toothpick poked in the middle comes out clean. Don't worry if the cake gets a few brown spots on top, we'll take care or that later.

While those cakes are cooking, mix up your second cake mix per the box instructions. Separate into three more bowls. You will now need to make a yellow, orange, and red layer.

Red: Squirt red dye, mix. Yellow: Squirt yellow dye, mix. Look at that, already done.

Orange: Add one or two drops of red and like 5 or 6 yellows. Keep adding yellow or red until you reach your desired color. Remember, a little red goes a long way.

The next step is to check on your cakes! Did you forget about them in the oven? Pull them out if they are ready. Let them cool for 10 minutes before you flip them out of the pans.

After you have depanned the cakes, you will need to wash the crumbs out, dry, and regrease the pans for the next round of cakes. You will want to make the green and yellow layers next. Follow in same fashion until you have all the layers baked and cooled. In between layers, clean your kitchen or eat out of the tub of icing so you have the energy to carry this thing through to the end.

The next step is really, really important. If you don't remember, earlier this month I had a cake fall and slather chocolate icing down the kitchen wall right before a party. Why did that happen, you ask? Because I didn't take the time to level the layers before stacking them. All you have to do is take a serrated knife and carefully carve the domed top off each cake layer. This will carve off any brown spots that might have formed on the top as well. Jonathan took care of this because, as we all know, I can't be trusted with knives. All was well in cake land.

Carved and Chillin'!
After all your layers are good and cool, you can grab your tub-o-icing and get to work. I iced mine on a pedestal, so I laid down four strips of parchment paper in order to keep the icing off the edges. Put a medium sized glob of icing down in the middle of your plate to hold the bottom later still. Carefully pick up the purple later and place the bottom side down, and the carved layer up. This is important, pay attention Myrtle. Ice the purple layer, being sure not to mound icing towards the middle. We don't want a dome. Add the blue layer next, bottom of the cake down, cut layer up. Eat some icing to fend off exhaustion.


ICING!!!!!!!!!

You will follow suit with the green, to yellow, and finally orange layers. Make sure to take your time and make sure that you are placing the layers center each time. You don't want a leaning tower of Pisa cake. That is for another lesson.

Now, you're probably wondering about the red layer. Why does it get special treatment?! Here's why. You want to put the red layer carved side DOWN so that you don't get little crumbies all over the icing. The bottom side will be better about holding its business together, especially if you let it completely cool like I told you to just minutes ago. Spread a thin later of icing on top of this layer as well. Here is the mash-up:


It was after 10 p.m. by this point
You will want to spread a thin layer of icing around the outer edge of the cake as well. It doesn't have to be completely covered at this point. In fact, you don't want it to be. You want it iced just enough to barely cover the layers. Now, you are going to put the whole damn lot in the fridge for 30 minutes and go take a shower or something. Why? Because your back will hurt from fussing over it, icing will be everywhere, and you will be cursing yourself for making this on a work night. Oh, and letting the icing chill will harden it up with the crumbs so that the final coat will cover everything nicely.

After the big chill, put your final coat of icing on and Voila! You have a secret rainbow cake. Now, don't be judgemental, because here is what mine turned out like:


Big and kind of deformed.
My cake had to make a 20+ mile trip to the office 90 degree heat, and I did not have a cover to put on this pedestal. What I did is put two dowel rods through the center of the cake to give it support. You can use drink straws if you don't have rods or skewers. (Thanks for the tip Nikki!) You'll notice the rods sticking out the top there. Then I used plastic wrap to make a sort of tent to cover it. The cake was then returned to the fridge for storage over night.

Jon and I woke up panicked every few hours wondering if it had fallen over. We each got up throughout the night to check on it.

The next morning we left the house at 6:30 a.m. to get me to the office on time. Jon had to drive me because the cake had taken on the weight of a toddler and could not make the trip without being held the entire time.

Once I made it to the display table, I SLOWLY pulled out the dowel rods and used a knife to cover the holes with icing. I was then chased off because judging was about to start. The contest officiators said there was a collective gasp when the cake was cut into. Who could blame them? This cake was truly awesome.

Taste the rainbow!

If you like what you see, please Follow Me for more recipes and cooking related antics.


Tuesday, March 29, 2011

Rotten Bananas: Take 2

We buy an awful lot of bananas around this joint, and dammit if they don't go bad before we get a chance to use them. I think I've Banana Breaded out everyone, so I thought perhaps a banana pudding would be a better way to go this time. I know it's almost foolishly simple to list how to make it here, but there are some people who cook so bad, they may need my assistance in getting it right. So, here we go.

Ingredients
1 box of instant vanilla pudding
2-4 medium sized bananas that are as spotty as a Las Vegas Grandma's forearms, chopped into small discs
1 box of Nilla Wafers Cookies
2 cups of cold milk

In a bowl, whisk together the instant pudding and the 2 cups of milk. It will soft set in about 3 to 5 minutes of whisking. When it soft sets, put it in the fridge to chill.

Next find you a good casserole dish or a large bowl to make make the final product in. You can get all Polly Perfect on it and make concentric circles of wafers and thin banana slices if you like. I, on the other hand, just made a bottom crust of cookies, the slapped a good mess of naners on top of those.

Fuck Polly Perfect
Then, you will need to add your chilled pudding. You can do a thin layer, then add some more bananas, wafers and more pudding. Or, you can just dump in your pudding like me. No appreciates your artistry here.

After that, you can add a nice layer of bananas and wafers to the top portion. I like to crumble a few for texture and prettiness. You don't have to. You can be all pirate's treasure on yours and trick your guests into thinking they are just eating plain pudding until they chomp into some mystery item. Is it banana, cookie, or toe nail? Only you will know the truth and you can giggle menacingly at their psychological torture. BWAHAHAHAHA!

On Nom

Thursday, October 28, 2010

Recipes You Learn Along the Way...

Going through life and minding your own business, you sometimes pick up useful tidbits from unlikely places. When I was in high school for instance, I was madly in love with this guy (which by the way I was scheduled to marry him in June of 2001, but that is a train-wreck for another time).

Anyway, I would go over to his parent's house and try to be as helpful and pleasant as possible. There were 5 kids in this household in a pseudo-Brady Bunch situation, and me being frequently-visiting type I am made it six. His mom's pantry was always full of tasty consumables, but trying to have a proper sit down meal around 6 teenagers was near impossible. She did eek it out sometimes to the tune of this cheap recipe. It could be served as any meal, and none of us complained when it was breakfast the next day. (not that I ever had it for breakfast at that time. I had to be home by midnight on Friday and Saturday thank you very much!).

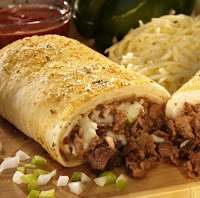
Today's lesson, kids, is how to make Stromboli a la Bobby's Mom:

You will need:
1 package of frozen self-rising bread loafs (the kind I buy comes 3 to a package)
non stick cooking spray and saran wrap
1-2lbs. of breakfast sausage in your favorite flavor  (substitute chopped ham lunch meat for a healthier version)
1 large pack of shredded cheese that you like

Distructions:
Depending on how hot your kitchen is, you will need several hours to rise the frozen bread dough. Some people, who live in really well insulated homes, put it out before they go to work and it's risen enough to get by when they return after work. Putting it out about lunch time is average. Place the loaf in a well greased bread pan. (1 loaf feeds 2-3 people so rise the number that you need accordingly.) Spray the top of the loaf with more cooking spray, and loosely cover with a large piece of Saran-wrap. This will prevent the dough from drying out and/or sticking as it rises. Let the dough rise until it is about an inch over the edge of the pan.

When the dough has risen, or nearly risen, go ahead and fry up that breakfast sausage. One pound is enough for 2 loaves.When the sausage is sufficiently browned, for the love of God let some of the fat drain off on a few paper towels while you do the next step. Your heart will thank you later.

Pour some of that shredded cheese on a prep-plate, or just have it ready to get out of the bag, whatever.

Now this next bit might seem a little counter-intuitive after the whole, wait 10 hours for the bread to rise bit, but hear me out. The next thing you do is pop the dough and make a little trough in the middle like so:

Pop!

n' trough


 The next step is laying down a layer of cheese, followed by a layer of meat, then more cheese.


Okay. The next two steps are tricky, so pay attention Myrtle. You are going to now seal up the loaf so that its guts are neatly encased. Simply fold over the edges and pinch them together. Gently now, don't get too rough:

Pinchy, pinchy
Now, if you're a bit lazy like myself, you can just pop it in the oven as is, and cook according to the bread bag's suggestions (usually like 20 minutes). But if you are a Polly Perfect and want to impress your son's girlfriend with your culinary skills, you can do the flip. Very carefully and oh so quickly, slide your hand under the entire loaf and flip it over so the pinchy side is down. Behold:

Now is not the time for pinching.

Flop! *raspberry noise*

Bake immediately as the teens are probably growing restless and pilfering bits of dough and cooked sausage. When it's done, slice it into pieces like any old loaf of bread. If you're a natural, it will look something like this:

I suppose could have put peppers and onions and other veggies in there if you like.


As a mom, you can try to do the respectable thing and serve this with a salad or something green, but let's be honest here, we're Americans. Grab a coke from the fridge, sit down in front of the tv, and enjoy the stromboli for what it is.

Tuesday, September 7, 2010

Weddings Make Women Lose Their Minds...

I recently had my first bridal shower, and let me just say, "It is official, I have lost my mind." I got the bright idea to let everyone else handle the food for the shower except the little mini fondant cakes I wanted to make. Well, naturally it turned out a huge mess that went down something like this:

T'was the Night before the shower and all through the kitchen
women were cursing, and screamin' and bitchin'!

Mom lost the fondant cookie cutters, and my bright idea to use cutters to make little round cakes didn't pan out. The cut-outs just crumbled into little pieces everywhere. My aunts, who were hosting the shower, were ready to give up and buy store bought cakes. I could not bring myself to give up though, so I made a plea to start over making cupcakes instead. We tossed out the two, crumbled cake-messes that we had attempted to turn into something cute and respectable, and dashed off to the store for cupcake holder thingys. Well, my mom did because she was so upset about losing the fondant cutters that she needed to clear her head.

I, on the other hand, set about to rolling and cutting out fondant circles in preparation for later. So, after a few more hours of baking, we had some cute, little fondant-covered cupcakes. Mom went out and bought more little cutters, but we failed to get pictures with all the cute designs because we had 40 cupcakes to go. So basically you see the base coat here:

I somehow managed to get fondant all over my feet. Don't ask me how.

Because I was sucha horse's ass about having these things meticulously perfect, my lovely aunts went about other pressing duties...

Aunt Loyce, finger sandwich extraordinaire! (and Official Butt Swatter. Apparently I tried to help too much.)

Acting as sous chef, housekeeping, and family matriarch was Aunt Pat.

Official title: Watermelon Fruit Bowl Maker
Between the four of us arguing for an hour, we finally decided on my Grandmother's buffet as the official tea holding location. (The theme was a tea party.)

Me and Mum share a spot of tea.

Then the party started, it was craziness. The cupcakes and sandwiches were hoowarfed down in no time because 31 of the 37 people invited showed up. Let me just say that this was NOT AT ALL EXPECTED because:

a.) I'm a horse's ass and a bad friend. So naturally, I didn't expect that many people to come. What a surprise this was:
That's not all of it either, there are packages behind me as well.


I also had an incredible game planner. She took tired, old shower games and breathed new life into them. They were hilarious and fun for all!

Glee fanatic, Gingerific gal-pal Samantha (Matron of Honor Extraordinaire!)


Here is a picture of one of her games, where people had to memorize what was on my apron and try to remember when I left the room. The person who remembered the most wins. Knowing that I love to cook, she made everything cooking related, and bird-themed, like the wedding. Truly awesome!

Fabulous!
There was the inevitable opening of gifts, in which I tried hard to make it interesting so people didn't get bored out of their minds. There was the bow incident...


A near disaster with Jon's mother grew concerned when I mentioned that he and I had to argue about registering for some towels. I had said that I knew standard towels wouldn't fit around him because he is such a big guy.  Side NoteHe wanted to register for one towel for each of us, and ones that were so small that it wouldn't go around him. I insisted on "bath sheets" and added a few more to the registry behind his back. Seeing Jon's mother's uneasiness my mom calls out, "How do you know a regular towel won't fit around him..."

 Thanks Mom for calling me out. (Sam saved the day: "Ummm, hello! THE POOL!")


I was totally embarrassed and tried to hide in said bath sheet.

 So other than that, all went well. When the boys started sneaking around for a sandwich, they found all the food gone and had to fend for themselves. I got a kitchen full or neato gadgets that I am itching to try out. I am thinking up my next challenge as I type...something involving using every new gadget I just got and chronicling its use here. Whew what a day! I couldn't have imagined a more perfect shower. It was beautiful, I felt beautiful. I felt so loved by all the special women in my life.